Switch Tie Plates …

Of course, then there is the product that started this whole thing, tie plates. I have moved away from the tie plates themselves as it seems that others can do the regular tie plates quite well and thus there is no real need to delve too much into it. Specifically, I like Jimmy Simmons’ tie plates from http://www.monstermodelworks.com. In this post, I’ll be talking about switch tie plates. I recently just updated my switch tie plates for use with 16′ 6″ points, either number 8 or number 10 turnouts.

https://www.shapeways.com/product/UX7B6B5MK/switch-plate-array-o-scale?key=998b54b85419805f18774dd12bdd9518

This comes with the gauge plate in both insulated and non-insulated iterations. The trouble with it is that you will have to order the adjustable rail braces seperately since those were drawn in Sketchup and thus are not compatable with the Solidworks files I create now. The braces are drawn specifically for Code 138 rail, but the plates themselves will work with either code 125 or code 138. With some filing, the rail braces should fit into the code 125 without an issue. I have to draw a set for code 125, but that requires drawing a code 125 rail and I don’t need to get into the details … Here is the link for the rail braces, there are two types:

https://www.shapeways.com/product/BR8TYWZ7Z/o-ajrb-12-array-of-12-adjustable-rail-braces?key=e12494e72e842f35c05a7cee8e69424b

But, apparently, there is only one style up there for sale seperately. You will also need hook tie plates for under the frogs, which you can find here by themselves:

https://www.shapeways.com/product/MXZ4CLGXR/o-scale-embossed-hookplate-num-10-array?key=6976489968b88764734baa9d66ae6ed0

Or here with a pair of 9ft long guard rails, which are very nice. This second set is a bit more useful, in my opinion, not just because of the guard rails, but also it has a lot more of the hook plates that you actually need, as opposed to what the standard plans say you should use, it is up to you.

https://www.shapeways.com/product/XK76MASNK/l23-l27-hp-array-40-w-9ft-guard-rail?key=956c1f5f77373947062cbafb19b7e914

There is also this version of the hook plate array, with more plates so that you have some extras, I just saw that it was not up for sale.
https://www.shapeways.com/product/9U8KQ5VT5/o-scale-num-10-hook-plate-array-repaired?key=4cb1d54a7fd72752d573694ee2bdf095

Another New AtlasO Project, converting 100 Ton Roller Bearing Trucks …

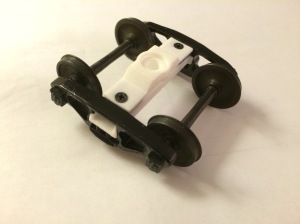
2015-08-15 20.18.00So, what is this, you may ask? This is a bolster to convert the AtlasO 100 Ton Roller Bearing truck to Proto48, yes, but with a twist. In this case, since I am converting a number of cars to my more prototypical bolster and my 3D printed 100 Ton Roller Bearing truck is essentially just a copy of the Atlas truck anyway, I figured that I would take what I already had and make it work.

What this requires is the same axles that I have been using from Protocraft, but the tabs need to be either cut or ground off the side frames. To stabilize the trucks, I add the interior spring and brake shoe detail, which I haven’ t gotten around to in this picture. The link to the bolster itself is as follows:

https://www.shapeways.com/product/CC56ZD7JG/100trbambossh-100t-rb-p48-truck-bolster?key=e9b7a467dcd3f4d77ffe27895282c0a8

At this point, I have not added the bearing caps, which I will do at some point, or you can just order them separately. You could also leave off the interior spring and brake shoe detail which would leave the truck sprung. Also bear in mind that while this bolster WILL mount onto an Atlas car, the coupler height will be wrong, so you really don’t want to use this unless you are using one of my Atlas Mount car bolsters.

A Little More On the New Atlas O 70 Ton Truck Conversion

2015-08-14 20.38.162015-08-14 20.20.51So, here is the first 70 Ton truck on its way to completion. I added bearing end caps printed in Frosted Extreme Detail and I made custom truck springs from .019 brass wire which is closer in diameter to the coils used in prototype truck springs. They do look a little heftier and aren’t that hard to make, but a little time consuming. Since I have been robbing Peter to pay Paul with my truck conversions, stealing springs from one to use in the other, I am either going to have to buy springs or make them at some point. Since these trucks are rigid, not sprung, it doesn’t matter that these aren’t very … springy.

You are supposed to clean the FXD (or FUD for that matter) models with Bestine before painting … but I didn’t. What does that mean for paint adherance long term? I’m not sure, but since I don’t have any bestine where I am at right now, I didn’t feel like waiting.

The FXD bearing caps look nice, but are they worth the premium? I’m not sure. Perhaps if I drybrush the caps with a lighter color the lettering on them may pop a little more and the extra money may be worth it, but we will see.

2015-08-14 20.23.42

These will be going onto my first Proto48 foray, an AtlasO Trainman 50′ 6″ boxcar that I weathered up and replaced the cast on grab irons with wire when I started out several years ago, before my start in 3D printing. I will do a post on that car once I mount these trucks on it, perhaps tomorrow.

Converting the “New” AtlasO 70 Ton Roller Bearing Truck

2015-08-11 20.59.172015-08-14 18.02.32

2015-08-14 18.02.43 I am not entirely enamored with this style of post with the weird way it loads in photos, but alas it is what it is…

Here are the photos of the New Style AtlasO 70 Ton roller bearing truck. In this particular case, I am using the Realistic Drop in Replacement (RDIR) conversion bolster. What this does is converts the truck with a bolster that looks more realistic than the standard Atlas parts, but still allows you to not HAVE to make any more modifications to the car for coupler height, unless you want to. Even if you use Protocraft couplers, it should be okay. These use the more standard 33″ Protocraft wheelsets, which you can find here:

http://www.protocraft.com/category.cfm?ItemID=130&Categoryid=4

And the link to bolster on Shapeways is the following:

https://www.shapeways.com/product/LYUHGKNH2/rdirnatlo70trb-realistic-conv-bolster-for-70t-rb?key=e6702f991dd458d827f874cd150a9e53

If you want the less expensive exact copies of the atlas parts, you can find it here:

https://www.shapeways.com/product/AWTYNED62/dir-natlo70trb1-atlas-o-70ton-rb-truck-conversio?key=4bdd393e16967a6464c3aed3fbf5567c

There are a couple of caveats with the RDIR truck: As I found out, you will need to drill a clearance hole for the screws that hold the sideframes, although I will work on repairing the model to have that feature. It also isn’t coming with the end caps on the model. My suggestion would be to buy a set of 8 or 32 end caps which will work with these axles … They won’t work properly with the 100 Ton axles from Protocraft, since the ends are different. The good thing about ordering the bearing caps separately is that you can order the more detailed versions, which should look a lot better than the ones made with WSF, but it is, of course your choice. Here is the link for ordering the bearing caps:

https://www.shapeways.com/product/JU488ST22/bearing-cap1a-s32?key=86092f9933558ad46248c44204a6bafe&optionId=55999590

Addendum …. I added a comment to this post, but I’m not sure that everyone will see that right away, so I will put this in the main body of the post: I have made modifications to the bolster to add the bearing caps and bored out a hole in the bolster to permit the use of the side frame screws without issue … in theory. I also hollowed out the bottom part of the bolster, so the increase in cost for the bearing caps is only $0.50 per bolster pair. Here is the link to the new part …

https://www.shapeways.com/product/C6XRDYSE4/70t-atlas-rdir-nbsm-hollow-pair-w-brakes

The Question of Axles ….

In a previous post I mentioned that if you had the “Old Style” Atlas 70 Ton Roller bearing trucks with the rotating end caps, you would have an issue with the Protocraft axles. The don’t work, at least they won’t permit you to have the rotating end caps. The 36″ roller bearing axles will, but all of the wheelsets that have 33″ wheels, which you need for 70 ton trucks, have shorter axles (you can also get 36″ wheelsets with the shorter axles, which work well with the new style of Atlas Truck.)

What that leaves you with is Northwest Short Line (NWSL) axles as seen below.

2015-08-13 20.10.47 2015-08-13 20.11.36 As I hope you can see from these rather stinky photos, the axles fit in the truck bushings just fine, but they have a shoulder on one side, which does NOT fit in the bushings. Now, technically speaking, this probably doesn’t seem like much of a problem, since as you can see from the bottom photo, when the bushing hits the shoulder, the side frame doesn’t sit so far away that it looks unrealistic, I could live with that. The problem is that because the axle end is pointed, not enough of the axle sticks out of the side frame for the bearing cap to grip onto, thus creating the problem. The only way to correct this is to turn the shoulder down so that more of the axle protrudes from the side frame. This is a situation that I was hoping to avoid the need to use machine tools… since one of the barriers to entry of Proto48 is the whole “you need a machine shop to model in the Proto48″ mythology.

I have asked Norm from Protocraft if there is a way to mount 33” wheels on the longer roller bearing axles. Since the 70 ton trucks will only be mounted under boxcars, the use of the heavier, 100 Ton axle shouldn’t be noticeable.

The other option would be to sell the trucks on eBay and get the new style … Or wait for me to produce a 70 Ton Roller Bearing truck of my own, which I will be working on in the future, but there is no time line on when I will get it produced.

The Bolster That Started It All … Old Style AtlasO 100 Ton Roller Bearing Truck

The bolster that started it all was the Old Style AtlasO 100 Ton Roller Bearing Truck Bolster. I designed it as a copy of the Atlas parts, just narrower. In fact, with these bolsters, it takes the Atlas truck to EXACT prototype width. The problem with THAT is that only the Protocraft modern 100 Ton Roller Bearing axle sets are long enough to protrude from the frames enough to put the rotating end caps on, and then, only just barely. Here is the link for the Protocraft axles:

http://www.protocraft.com/category.cfm?ItemID=142&Categoryid=4

And here is the link for my bolster:

https://www.shapeways.com/product/567GCTURE/dir-oatlop48-roller-bearing-truck-bolster?li=related-items-solr&optionId=3806355

2015-08-11 20.59.30 This is an early version of the bolster, and it used the detail plastic in its creation. I don’t recommend that as it is fairly brittle (which is very undesirable in a truck) and more expensive. This is also a very early version of the AtlasO Roller bearing truck, with cast on bearing end caps, not rotating ones. If you have this version of the truck, then you can use the following axles from Protocraft:

http://www.protocraft.com/category.cfm?ItemID=140&Categoryid=4

Since the axle ends don’t need to protrude, the shorter axles will work just fine.

The axles you see in the above photo are, in fact, NWSL 33″ axles, not 36″. The truck in question is a 100 Ton truck, thus it should have 36″ axles, but at the time, that’s what I had and I used them. Now, I prefer Protocraft axles, but I will discuss needs and the issues with the NWSL axles in future posts.

Again, if you want to order directly from me, the cost per bolster will be $15, plus shipping and I will inspect and clean up the bolsters before shipping them. Please contact me at toruk2010@live.com.

Converting an AtlasO 50 Ton Barber Bettendorf Truck – Old Style

The first truck conversion bolster I am posting may strike everyone as being a bit odd, since I am a modern modeler. I had to make some modifications to the model, however, and upload the new model to Shapeways. The model is now correct, but the test that I printed had a significant flaw … I forgot to countersink the truck screw hole on the bottom of the truck … Doh!

While I know that Atlas has modified their roller bearing trucks to have a more prototypical appearance with narrower side-frames, I am not sure whether they have done the same for their Barber-Bettendorf trucks, so I will refer to this as the “Old Style.”

The model number is DIROATO50TBB. The direct link to the model on my Shapeways Store is:

https://www.shapeways.com/product/BGNNV5AJG/diroato50tbb-50t-barber-bettendorf-conversion-b?optionId=57401537

2015-08-12 19.38.19 2015-08-12 19.38.27 2015-08-12 19.38.34 2015-08-12 19.38.53

For this conversion I used Protocraft PC-334 Axles. Which are 33″ 2-wear wheels with 70ton AAR “C” Axles. Are they technically correct for this truck? No, but, well, I don’t really care that much since I got a bulk order of axles and some of them need to go in 70Ton Roller Bearing trucks as well, so I compromised. Here is the link to Protocraft’s Proto48 axle page:

http://www.protocraft.com/category.cfm?Categoryid=4

If you don’t want to deal with Shapeways, please contact me at toruk2010@live.com and I will work out a price to buy the bolsters from me directly at a cost of $15 per pair, plus shipping. I will inspect the bolsters myself and ship them priority mail.

Barriers to entry … Converting AtlasO Trucks

One of the issues that Proto48 has is that the barrier to entry is fairly high. For those interested who are coming from other scales, it can be very daunting. One of the major players in the O scale market is AtlasO  and they make some beautiful equipment. All of their rolling stock is to scale and beautifully detailed, even if there isn’t enough of it. Both their 2-rail O Scale and 3-rail O gauge offerings can be converted to Proto48 and make great candidates for the fledgling Proto48 layout, but there is a catch…

Atlas O trucks are quite good looking, but they are built very wide to accommodate both the 2-rail and 3-rail wheelsets. While Northwest Short Line sell axles to convert these trucks to Proto48, they do not correct for the oversize bolsters and thus, leave a large unrealistic looking gap on either side of the truck. In the past, if the modeler wanted to correct this flaw, he had to machine the correct amount of material from both sides of the bolster, then drill and tap for screws to hold the sectioned bolster together. For many modelers in the Proto48 realm, this is not an issue, but for many who are now looking to enter this intriguing scale (including me) they just don’t have either the machine tool skill or the tools themselves to easily make these modifications. For the new modeler, this conversion can easily take between 45 minutes to an hour, per truck and for those coming from HO, this is just not what they want to do. Several years ago, 3D printing and Shapeways came to the rescue.

2015-08-11 20.59.17 2015-08-11 20.59.08 2015-08-11 20.59.302015-08-11 20.59.45

I can’t remember the first bolster I designed, but I created a bolster that could be 3D printed and would replace the stock AtlasO bolster with the exact same part, but that was narrowed to the correct prototype width. Since the bolster needs to be removed to swap the wheelsets out anyway, this bolster would decrease the amount of time to convert an AtlasO car to Proto48 from 2 hours to 10 minutes or less. While to get all of the benefits from Proto48 would require more modification of the car to use more accurate couplers and truck bolsters … the novice modeler could get up and running in very little time.

That is the purpose of my Drop in Replacement (DIR) bolsters, to get your Atlas O models up and running on Proto48 track in as little time as possible, for a minimal investment.

Most of my work up to this point has been on roller bearing trucks, since I am a modern modeler, but I have, as late, branched out to two of AtlasO’s other offerings. As I get the opportunity, I hope to get more bolsters for the other AtlasO truck offerings available. If you don’t find what you want or need, please contact me and we can see what can be done to accommodate you.

In another post, I will detail the boslters that I have designed and that are available from Shapeways, including direct links to the parts to order them directly from them. In addition, I intend to offer the bolsters for sale directly from me. The one benefit of purchasing from me is that I will inspect the bolsters for quality and clean them up as necessary, but there will be an additional cost that I will detail in the upcoming posts.

Onward and upward.

And So It Begins …

For all of you who are interested, you can thank the existence of this blog to Norm Buckhart from Protocraft. It was Chris Abbott’s idea to use a blog to reduce the cost of creating a website, since I truly doubt I will be selling many of my Proto48 items, but I hope this site will help those of you interested in converting to Proto48, to find any of my Shapeways items that will facilitate your doing so.

I will post links to my bolsters in Shapeways so you can order from them directly, or alternatively, I will make it possible to order the parts directly from me. In addition, I will try to keep everyone up to date with my latest offerings and projects as they become available.

Welcome to the wonderful world of Proto48.